Instagram Story & Reels Size: 1080×1920 and the Safe Zones
Published September 29, 2026
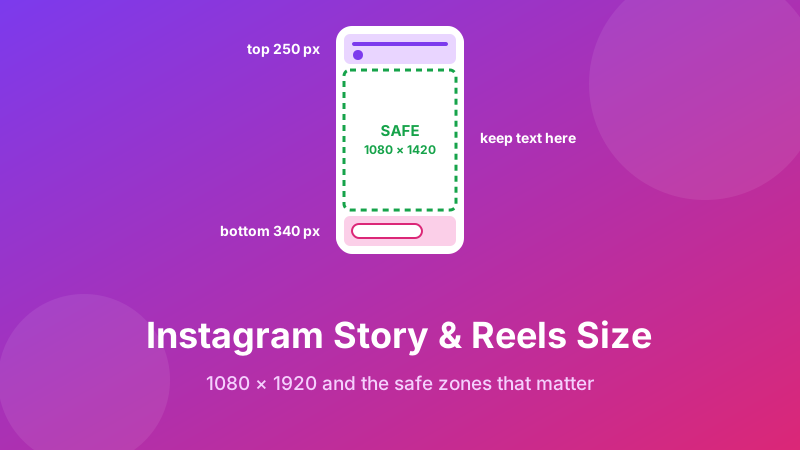
Instagram Stories and Reels are both 1080 × 1920 pixels, a 9:16 vertical rectangle that fills a phone screen. Every size chart on the internet tells you that much, and it is the easy half of the job.
The hard half is that Instagram draws its own interface on top of your image — your profile name, the progress bar, the reply box, the caption, the like and share buttons. Put a headline in the wrong place and a button sits on it. This guide gives you the pixel-exact safe zones for both formats, explains how Reel covers get cropped in three different places, and shows how to fit a landscape photo into a Story without Instagram zooming in on it.
Turn any image into a 1080×1920 Story
Choose the Instagram Story / Reel preset, pick Contain to keep the whole photo, and download. Free, private, nothing uploaded.
Open the Social Media Resizer →The sizes at a glance
| Format | Canvas | Keep content inside |
|---|---|---|
| Story (photo or video) | 1080 × 1920 | Middle 1080 × ~1420 |
| Reel | 1080 × 1920 | Middle-upper area, clear of bottom and right edge |
| Reel cover | 1080 × 1920 | Centre 1080 × 1350 (survives every crop) |
If you only remember one thing: design on a full 1080×1920 canvas, but put everything that matters in the middle. Background colour and imagery can run to the edges; words, faces, logos and prices should not.
Story safe zones, in pixels
On a 1080×1920 Story, three strips are unsafe:
- Top ~250 px. The progress bars, your profile picture, username, the time stamp and the close button live here.
- Bottom ~250–340 px. The “Send message” box, the like heart and the share arrow cover this strip. Link stickers and swipe prompts also tend to land here.
- A small side margin, ~60 px. Not covered by interface, but taps near the edges skip to the next or previous Story, and some phones round off the corners.
That leaves a clean central block of roughly 1080 × 1420. Build your headline, main image and call to action inside it and they will be readable on every phone.
Why a range rather than one number? Taller phones show the Story with slightly different framing, and Instagram adjusts its buttons between app versions. The larger figures are the cautious ones; use them when text really must be visible.
Reels safe zones are bigger
Reels use the same 1080×1920 canvas, but the overlay is heavier because the caption, audio track and action buttons all sit on the video:
- Bottom ~400–450 px: username, follow button, the first line or two of the caption and the audio label.
- Right edge ~120–150 px: the like, comment, share, save and audio buttons stacked vertically.
- Top ~200 px: the “Reels” header and camera icon.
So the usable area is shifted up and slightly left of centre. On-screen captions (the text you burn into the video) belong around the middle of the frame, not at the very bottom where TV-style subtitles usually go — that is exactly where Instagram's own caption will cover them.
Reel covers: one image, three crops
The cover of a Reel is shown in three places, and each crops it differently:
| Where | Shape shown | Visible part of 1080×1920 |
|---|---|---|
| Reels tab / full screen | 9:16 | Everything |
| Profile grid | 3:4 | Centre 1080 × 1440 |
| Main feed | 4:5 | Centre 1080 × 1350 |
The common failure is a cover with the title across the top in big letters. Full screen it looks great; on your profile grid the top 240 pixels are gone and so is half the title. Keep cover text inside the centre 1080×1350 and it survives all three views.
Posting a landscape photo to a Story
Share a horizontal photo straight to your Story and Instagram usually zooms in to fill the screen, cutting off both sides. You have three better options:
- Pad it. Place the whole photo inside a 1080×1920 frame with a solid or matching background above and below. The picture stays intact and the empty space becomes room for text or stickers.
- Pinch it smaller in the Story editor. Works, but the background colour is picked for you and the result varies between phones.
- Crop to 9:16 on purpose. Only if the subject sits in a narrow vertical slice of the photo anyway.
Option one is the most reliable and takes seconds with a resizer that has a fit-and-pad mode.
How to make a 1080×1920 Story image
- Open the Social Media Resizer and drop in your image. It is processed in your browser; nothing is sent to a server.
- Choose Instagram Story / Reel (1080×1920) as the target size.
- For a landscape photo, choose Contain and pick a background colour — black, white or a brand colour. For a photo that is already vertical, Cover fills the screen by trimming evenly from the centre.
- Download and add it to your Story. Add text and stickers inside the safe area in the Instagram editor.
Video specifics worth knowing
Stories play each video segment for up to 60 seconds; longer clips are split automatically. Reels can run up to three minutes. Export video at 1080×1920, 30 frames per second, as an MP4 with H.264 — the format Instagram re-encodes most gracefully. A still photo in a Story stays on screen for about five seconds, which is enough time for roughly one short sentence. If your graphic needs longer to read, it has too much text.
Checklist before you post
- Canvas is exactly 1080×1920.
- No text in the top 250 px or bottom 340 px (Reels: bottom 450 px and right 150 px).
- Reel cover title sits inside the centre 1080×1350.
- Landscape photos are padded, not zoomed.
For feed posts see Instagram post size, and for your avatar see Instagram profile picture size.
Stories that fit, every time
Resize or pad any photo to an exact 1080×1920 Story in your browser — free, private and without a watermark.
Open the Social Media Resizer →